As we left before the commercial break, we had just set up the navigation links between our emplist and empedit pages. Let's first fix up the "Edit" and "New Employee" buttons on the emplist page so that clicking them will take us to the edit page. To do this is really quite simple. For the edit button, select the button using either the visual editor or the structure window; then, use the property inspector to set the Action property to "edit," which is the navigation case you created. There's even a drop-down list in the property inspector - JDeveloper knows about the navigation cases, and thus can give you a drop-down list. Now, just do the same thing for the "New Employee" button; in this case, at run-time, the action listener (which creates the new employee record) will fire first, and then the action property causes the navigation case "edit" to fire, taking you to the empedit page.
Now, let's create the skeleton of the empedit page. First, ensure empedit.jspx is shown in the visual editor. Then, in the data control palette, drag MyEmpView1 to the empedit.jspx page and drop it. In the pop-up menu, select "Forms" and then "ADF Form" from the sub-menu. Ensure the "Include Submit Button" checkbox is selected and click "OK."
Let's next add a commit button to the page so that the changes can be saved to the database. In the data control palette, expand the AppModuleDataControl and then expand the "operations" folder from the data control - be sure it's the AppModuleDataControl's operations folder, and not the MyEmpView1's. If you have the correct one, you'll see Commit and Rollback operations. Drag the commit operation and drop it on to the empedit.jspx page next to the submit button. In the pop-up menu, choose "ADF Command Button." Finally, select the "Commit" button and use the property inspector to set the Action property to "returntolist." This will make clicking the commit button take us back to the list page as well as committing the data to the database.
Now, we've got a basic working application. Let's test it; right-click the emplist.jspx page in the applications navigator and choose "run." You should see an (empty) list of employees. Click the "New Employee" button, fill in some values, and click commit. You can also test editing an employee you create (use the "submit" button to submit changes and make ADF enable the commit button). For now, create at least two employees, one with emptype of "H" and one with emptype of "S." Here's what my emplist.jspx looks like after I did that:

There's a lot more we should to to make this a real application (adding a "Cancel" button, for example), but I'll leave that to you. What we really want to show now is how to make the Salary field hidden (and set to null in the database) when the employee type is "hourly" and make the Hourly Rate field hidden (and set to null in the database) when the employee type is "salaried." There are a number of ADF Faces controls we could use to implement this (they all start with "ShowOne"), but for this example, let's use a ShowOneRadio.
In the Component Palette, ensure the ADF Faces Core components are showing and locate the ShowOneRadio. Drag it to the empedit page and drop it between the Emptype and Salary fields (it's easiest if you use the Structure window). Use the property editor to change the label to "Employee Type." You should now have something that looks like this:

The "ShowOne" components work by having "ShowDetail" components as their children. So, locate the ShowDetail component in the Component Palette and drag one to the af:showOneRadio you just created; again, it's easiest if you use the Structure window to ensure you are dropping it on the right component. Use the property inspector to change the Text property to "Hourly." Then, repeat the same process to create another ShowDetail component with its text set to "Salaried." When you are done, the Structure should look something like this:
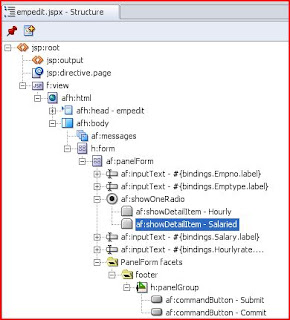
The next step is to put the Salary and HourlyRate fields into the appropriate ShowDetail component. To do this, just use the structure window to drag the Salary's af:inputText component to the "Salaried" showDetailItem and the Hourly Rate's af:inputText component to the "Hourly" showDetailItem. Your structure now should look like this:
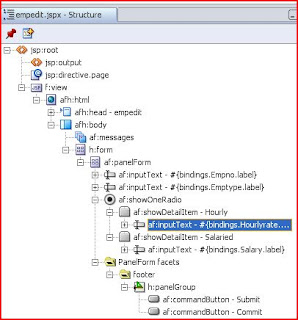
If you run the application now, you'll see that clicking the Hourly or Salaried radio buttons automatically hide/show the appropriate fields; however, the value of the EMPTYPE field doesn't have anything to do with the radio buttons at this point. We'll need to write some code to make that part work.
The code that you will write needs to be in a java class known as a "managed bean." We'll let JDeveloper create the managed bean for us. If you click one of the af:showDetailItem components and look in the Property Inspector, you'll see a property called the "Disclosure Listener." This is where we will write our Java code (for you experts out there, yes, the af:showOneRadio has an attribute change listener that is a better place for the code, but for some reason, it does not fire correctly in JDev 10.1.3.1). To create the managed bean, select the Hourly showDetailItem in the Structure window and then click in the blank field next to "DisclosureListener" in the Property Inspector. You should see a button appear with an elipsis (...) in the label - click this button. You'll get a dialog that looks like this:

Click the "New..." button to create a new managed bean. Use "empedit_bean" for both the name and class and leave the scope set at request:
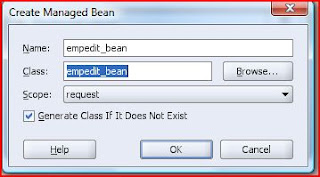
After clicking "OK", click the "New..." button next to the Method drop-down list. Provide a method name of "hourly_disclosed" and click "OK." The dialog now looks like this:
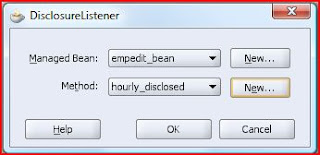
Click "OK" in the managed bean window. You should see a new tab at the top of the editor for the empedit_bean.java file that was just created. The code looks like this:
import oracle.adf.view.faces.event.DisclosureEvent;
public class empedit_bean
{
public empedit_bean()
{
}
public void hourly_disclosed(DisclosureEvent disclosureEvent)
{
// Add event code here...
}
}
Let's add some simple code to the disclosure listener so that we can see how it works. Change the hourly_disclosed method so that it looks like this:
public void hourly_disclosed(DisclosureEvent disclosureEvent)
{
if (disclosureEvent.isExpanded())
{
System.out.println("The hourly type was selected");
}
else
{
System.out.println("The hourly type was not selected");
}
}
Now, let's create a disclosure listener for the Salary radio button. Just type this code into the editor:
public void salaried_disclosed(DisclosureEvent disclosureEvent)
{
if (disclosureEvent.isExpanded())
{
System.out.println("The salaried type was selected");
}
else
{
System.out.println("The salaried type was not selected");
}
}
Finally, go back to the empedit.jspx page and select the af:showDetailItem for Salaried. In the property inspector, click the elipsis-button next to the DisclosureListener property and pick the empedit_bean managed bean and salaried_disclosed method:
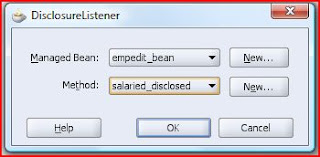
Now, when you run the application and click the Hourly and Salaried radio buttons, you should see a pair of messages in the log window for each click. This shows us that our code is running correctly. We now just have two steps remaining. The first is to make the value in the database field EMPTYPE determine which radio button is selected. This is really quite simple. If you go back to the empedit.jspx page and select the "Hourly" af:showDetailItem, you'll notice a property in the property inspector called "Disclosed," which is set to false. What we will do is to use an Expression Language (EL) expression to set the item to be disclosed if the value of the EMPTYPE field in the database is "H." To do so, click the Disclosed property in the inspector. You should see the "Bind to data" button become available in the property inspector toolbar - it looks like this:
Click the Bind to data button; this displays JDeveloper's EL editor. In the editor, expand the ADF Bindings folder, then the bindings container. You should see an attribute binding for "Emptype." Finally, expand that binding and double-click on the InputValue property. The Expression builder should now look like this:
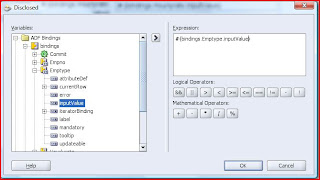
Complete the expression by typing so that it reads:
#{bindings.Emptype.inputValue == "H"}
Remember before when we set the default value of the field EMPTYPE to "H?" This is so we didn't have to code for the special NULL case here, although it's not too difficult. Now, repeat the same process for the Salaried af:showDetailItem, except the "disclosed" property should be:
#{bindings.Emptype.inputValue == "S"}
At this point, if you run your application and edit the two employees you created earlier (one hourly and one salaried), you should see the correct radio button selected and the correct field shown.
We now just have some cosmetic issues to clean up (we still have the EMPTYPE field on the screen) and one remaining problem: clicking the Hourly and Salaried radio buttons do not change the value of the EMPTYPE field - we haven't written the code to make this happen yet. Let's start by getting rid of the EMPTYPE field. If you just click on the EMPTYPE af:inputText and delete it, it will also delete the binding in the underlying page definition, which will make our page break, because we use that binding. Here's a little trick that I use to avoid this behavior. Before you delete the af:inputText item, open the page definition for empedit.jspx by right-clicking in an empty area of the empedit.jspx page and choosing Go to Page Definition. Now, you can go back to the empedit.jspx page and delete the EMPTYPE field. Now, just switch back to the page definition and close it, answering "no" when prompted to save changes.
The last item remaining is to set the value of the EMPTYPE field as we click the radio buttons for Hourly and Salaried employees. This code will go into the disclosure listeners. Let's code a simple utility method into our backing bean that will allow us to set the employee type, and we can call that utility method from the disclosure listeners. For good measure, let's also NULL out the salary for hourly employees and null out the hourly rate for salaried employees. I provide the code here with no explanation; this is pretty straightforward JSF code at this point:
private void setEmpType(String type)
{
FacesContext ctx = FacesContext.getCurrentInstance();
Application app = ctx.getApplication();
ValueBinding bind = app.createValueBinding("#{bindings.Emptype.inputValue}");
bind.setValue(ctx, type);
if ("S".equals(type))
{
bind = app.createValueBinding("#{bindings.Hourlyrate.inputValue}");
}
else
{
bind = app.createValueBinding("#{bindings.Salary.inputValue}");
}
bind.setValue(ctx, null);
}
Now, it's simply a matter of fixing up the disclosure listeners to look like this:
public void hourly_disclosed(DisclosureEvent disclosureEvent)
{
if (disclosureEvent.isExpanded())
{
setEmpType("H");
}
}
public void salaried_disclosed(DisclosureEvent disclosureEvent)
{
if (disclosureEvent.isExpanded())
{
setEmpType("S");
}
}
There we are.... there are lots of little things that can be cleaned up and made more robust, but that's the technique.
11 comments:
I read the first part and it helped me so much to understand all this stuff and that is why I'm not here learning more from your rich knowledge!
"I really appreciate the kind of topics you post here. Thanks for sharing information that is actually helpful. Good day!"
Excellent site! much success to you :)Gifts To Pakistan
You got a really useful blog I have been here reading for about an hour. Thanks alot
I read an article a few months ago that said there's one other remnant wood-paved street in the city. If I recall correctly, it was an alley off of Hudson Ave. in Lincoln Park.
Gifts to Pakistan | Send Gifts to Pakistan | Flowers to Pakistan
such a great blog send a gift to pakistan,!
an article a few months ago that said there's one other remnant wood-paved street in the city. search jobs for usa
great article I really like it corporate gifts durban!
such a great blog dengue fever prevention
great post digital marketing scope in Pakistan
middle class scholarship
scope of digital marketing in pakistan
Post a Comment