Monday, April 24, 2006

selectManyShuttle part One

ADF Faces selectManyShuttle Part One: the database

Well, I’m a day or two late with my promised weekend posting for this, but, as “they” say, better late than never. There’s been a question over on the JDeveloper discussion forum that comes up now and again that asks, “How do I create/use the af:selectManyShuttle component?” It comes up often enough that I thought I’d write a post about how I implemented one. I’ve decided to break it up into multiple parts in order to simplify the discussion.

The af:selectManyShuttle is a component that is used to pick multiple items from a list, and it’s rendered as a “shuttle” component that looks like this. It’s a nice, elegant component for doing things like assigning students to courses, for example, which is the example I have chosen to use.

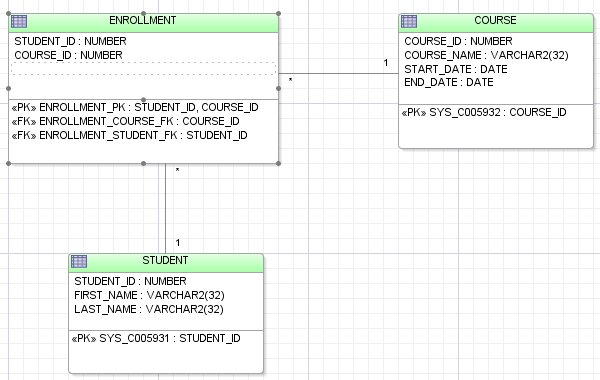
In this first installment, I’ll be going over the database design, and describing a stored procedure that I built to simplify use of the selectManyShuttle. The example I am going to be using is quite simple; the database will contain a student table and a course table. It will also have an “intersection” table called “enrollment” that is used to resolve the many-to-many relationship between students and courses. It’s this table that lends itself quite well to using a selectManyShuttle in the user interface. For a given course, we’ll display a selectManyShuttle to allow the user to assign which students are enrolled in the given course.

Tables and Triggers

The tables I’m going to be using are quite simple. Here’s a simple view of the database layout:


For those who’d like to follow along, here are the DDL statements that you can execute to create the tables:

CREATE TABLE STUDENT(student_id NUMBER PRIMARY KEY,
first_name VARCHAR2(32),
last_name VARCHAR2(32));

CREATE TABLE COURSE(course_id NUMBER PRIMARY KEY,
course_name VARCHAR2(32),
start_date DATE,
end_date DATE);

CREATE TABLE ENROLLMENT(student_id NUMBER NOT NULL, course_id NUMBER NOT NULL);

ALTER TABLE ENROLLMENT ADD CONSTRAINT enrollment_pk PRIMARY KEY (student_id, course_id);

I’ve also created a sequence and some triggers to automatically populate the ID’s:

CREATE SEQUENCE my_seq;

CREATE OR REPLACE TRIGGER student_bir
BEFORE INSERT ON STUDENT
FOR EACH ROW
BEGIN

IF (:NEW.student_id IS NULL) THEN
SELECT my_seq.NEXTVAL
INTO :NEW.student_id
FROM DUAL;
END IF;

END;

/

CREATE OR REPLACE TRIGGER course_bir
BEFORE INSERT ON COURSE
FOR EACH ROW
BEGIN

IF (:NEW.course_id IS NULL) THEN
SELECT my_seq.NEXTVAL
INTO :NEW.course_id
FROM DUAL;
END IF;

END;

/

There is one last piece to the database that I’ll explain here, but first a little more about the shuttle component. When you use an af:selectManyShuttle, the list of selected items is returned to you in an array. It’s this array that we need to use to populate our enrollment table. Now, we could simply iterate over the array in some java code and send a bunch of statements to the database one at a time, but that is very inefficient due to the overhead of a bunch of JDBC calls. What I decided to do was to write a stored procedure that would accept an array of student id’s and a course id and populate the enrollment table all in one fell swoop.

In order to do that, I defined a SQL type that would map to an array of java.lang.Integers:

CREATE OR REPLACE TYPE NUM_ARRAY AS TABLE OF NUMBER;

Then, I coded a simple stored procedure that would populate the enrollments for a course, given the course id and an array of student id’s:

CREATE OR REPLACE PROCEDURE Assign_Students_To_Course(p_course_id IN NUMBER, p_students IN NUM_ARRAY) IS

BEGIN

-- CLEAR out enrollment table and insert enrolled students

DELETE ENROLLMENT
WHERE COURSE_ID = p_course_ID;

INSERT INTO ENROLLMENT(COURSE_ID, STUDENT_ID)
SELECT p_course_id, column_value
FROM TABLE(p_students);

END;
/

Because my enrollment table doesn’t have any additional information other than the primary keys of the students and courses, it was more efficient to just delete the existing records and insert all of the students for the course at once. The only thing in this procedure that may be foreign to some of you is the TABLE operator, which lets us use an array as a table in SQL. The column “column_value” is what Oracle uses to expose the actual data element stored in the array.

Lastly, because I wish to focus on the selectManyShuttle component, and not other elements, I used simple INSERT statements to insert a bunch of data for students and courses. In the next installment, I’ll show how to create the JSF page using the selectManyShuttle component.

Sunday, April 02, 2006

No, I'm not dead, I'm testing

I've been silent for a while on the blog - our application is nearing production rollout, so it's been a hectic few weeks. I plan to post some more interesting stuff once we go production. This has been my first JSF project using JDeveloper, and I must say that it's been quite a productive environment (JDeveloper, that is). We basically came in with a blank sheet of paper (no database, no application, nothing but an Excel prototype of what the main screens in the application should look like) and a handful of team members - and here we are 2 months later with a fully-baked, robust web application with > 80 screens and > 20 reports (done in Oracle reports). Kudos to the JDev team for creating something that gives that kind of productivity.

Tuesday, March 14, 2006

Using Updatable Views with ADF

Although the JDeveloper / ADF combination is a rich and productive environment, it’s sometimes easier to accomplish a requirement by using a feature or capability of the underlying database (Oracle, in my case). In today’s entry, I’ll discuss how we were able to simplify an ADF Faces-based web page by using a capability of the Oracle database.

The Problem

Like most applications, the application that we are currently building has parameters that can be set by an administrator of the system – nothing unique in that. However, our application has parameters that apply at different levels, or “scopes.” We have global parameters that apply to the whole system, country-specific parameters that apply to entities in a specific country, etc. Because the primary keys of each type of parameter are different, we decided to implement this using a different database table for each scope of parameter. So, in the example here, we have a global_parameter table and a country_parameter table. In actuality, we have more scopes than this example.

Once we designed the tables, we moved on to the user interface design for screens to maintain the parameters. One option was to have a separate screen for each parameter scope. However, the decision about which scope a parameter belongs to was made at development time; furthermore, an administrative user (who is responsible for maintaining the parameter values) may not know at which scope the parameter applies. For example, one of our parameters is the predicted inflation rate. Is that a global parameter? A country parameter? Some other scope? The end-user may not know. So, we wanted to show all of the parameters on one screen and include a “scope” column to show what the parameter value applied to. In our case, the inflation rate is a country parameter, so in the UI, we would show the inflation rate parameter multiple times, once for each country defined in the system.

The solution leads to a new problem

Now that we had designed a simple user interface, our next step was to figure out how to hook the UI and the database together. Based upon past experience with Oracle DB, the concept of an updatable database view immediately came to mind. We were able to develop a view that showed all of the parameters (by UNION’ing together the rows from different tables) and supported update (we don’t allow end-users to insert/delete parameter values) by writing a stored database trigger to implement the update capability. In Oracle terminology, this is called an “INSTEAD OF” trigger. The instead of trigger simply looked at the update that was being attempted, figured out the appropriate table to update, and performed that update.

So far, we were happy with the solution. We tested out the update capability in SQL*Plus, and everything was working fine. Then, we went into JDeveloper and created an Entity Object based upon the view, and an updatable View Object based upon the entity. Then, we added the VO to the Application Module and went to test. At that point, we ran into a problem. When we attempted to update a record in the AM tester and commit to the database, we started getting some SQL errors: “unable to select for update on a view containing distinct, union, etc.” It turns out that the ADF Business Components framework was attempting to lock the record by issuing a SELECT … FOR UPDATE statement against the view, and Oracle did not really like that, as the error message pointed ou.

The Final Solution

Once we identified the problem, we thought of several solutions. We could eliminate the locking behavior altogether; this obviously has some issues in a multi-user environment. But, how to lock a record in a view like this? Well, we had already written an INSTEAD OF UPDATE trigger that was able to determine which row in which underlying table is being updated; why not write a simple PL/SQL stored procedure to use SELECT … FOR UPDATE on the underlying row? Once we had this “aha” moment, the solution was clear.

The Code

If you’re still reading this, you’re probably saying to yourself “get to the code already!” So, here we go. The Entity Object has a method called, simply enough, “lock” that is called when attempting to lock a record for updating. We simply over-rode the lock method (in our EntityObbImpl class) to use our stored procedure for locking. In addition, the stored procedure returns the current database value of the parameter, so that we can compare it to the value currently in the EO’s version of the data. If the values are different, then another user has updated the parameter value since we displayed our page, and we throw an Exception to inform our user of this fact. So, the code:

The lock() method is pretty simple:

public void lock()
{
     handleStoredProcLock();
}

Wow, one line of code! Well, not really… Here is the code for handleStoredProcLock() – I cribbed a bit here from Steve M’s example on building a VO based upon a stored procedure instead of a table:

private void handleStoredProcLock()
{
     CallableStatement st;

     Try
     {
          String stmt = “BEGIN parameter_category_pkg.lock_row(:1, :2, :3);

          DBTransaction tr = getDBTransaction();

          st = tr.createCallableStatement(stmt, 1);

          // set the in-bound and out-bound parameters

          // Parameter ID and Parameter Type Usage are the PK attributes in our EO

          st.setLong(1, getParameterId().longValue());
          st.setString(2, getParameterTypeUsage().toString());

          st.registerOutParameter(3, Types.VARCHAR);

          int rows = st.executeUpdate();

          String newValue = st.getString(3);

          // Compare old value to DB value

          compareOldAttrTo(PARAMETERVALUE, newValue);

     }
     catch (SQLException e)
     {
          // if other user has row locked, then throw an exception
          
          if (Math.abs(e.getErrorCode()) == 54)
          {
               throw new AlreadyLockedException(e);
          }
          else
          {
               throw new JboException(e);
          }
     }
     finally
     {
          try
          {
               if (st != null) st.close();
          }
          catch (SQLException e)
          {
               // Ignore
          }
     }
}

private void compareOldAttrTo(int slot, Object newVal)
{
     if ((getPostedAttribute(slot) == null && newVal != null) ||
         (getPostedAttribute(slot) != null && newVal == null) ||
         (getPostedAttribute(slot) != null && newVal != null &&
          !getPostedAttribute(slot).equals(newVal)))
     {
          Throw new RowInconsistentException(
               createPrimaryKey(
                    getParameterTypeId(),
                    getParameterId()()));
     }
}

That’s all there was to it really. This technique can be used in a variety of cases where the Entity Object or View Object you’re working with is not built on a simple table – for example, a complex view like this one, or a stored procedure. I hope this was helpful – comments and feedback are always appreciated. I think the next installment will be about using the dynamic menu-ing capability in the ADF Faces Page component.

Saturday, March 04, 2006

A re-usable "Prompt to Save Changes" component

Today I'm going to share a component that we built on our current project. In order to understand why we built it, let me describe a simple situation: A user is on a web page that lets him or her edit some information. (S)he makes some changes on the page, doesn't save the changes, and clicks on a menu item that navigates somewhere else. All of the changes just went bye-bye! This is not a good thing. So, we decided to create a component that will detect such a situation and prompt the user about what to do. We wanted the component to be re-usable and simple to integrate into our ADF Faces/JSPX pages so that we didn't have to write gobs of code for each new page.

I'm not going to show every single bit and byte of code, but there should be enough substance to show what's going on.


The Menu

First, let's take a look at the menu. We are using a menu created via managed beans in the faces-config.xml file. I won't go into the details here about how to do that, but the SRDemo demo application (available from the JDeveloper "Check For Updates" menu) has a good example of that. All of our pages in the application use the ADF Faces af:Page component as the starting point. The af:Page has a facet called "nodeStamp" that if you put a af:commandMenuItem in there and bind the value property of the af:Page to a menu model, you'll get nicely rendered multi-level menus. So, let's take a look at how the menu is set up. Here's a few snippets of code from our page template:

[af:page title="#{res['template.title']}" var="pg"
value="#{menuModel.model}"]
As you can see, the page has a menu model bean bound to the value property. The nodeStamp looks like this:

[f:facet name="nodeStamp"]
[af:commandMenuItem text="#{pg.label}"
disabled="#{pg.readOnly||!pg.shown}"
type="#{pg.type}" useWindow="#{pg.useWindow}"
id="menuNode"
actionListener="#{bb.menuActionListener}"
returnListener="#{bb.menuReturnListener}"
rendered="#{pg.shown}"/]
[/f:facet]
The main thing to notice here is the actionListener and returnListener properties. This example shows that the actionListener is bound to a method called menuActionListener in the backing bean; similarly, the returnListener is bound to a menuReturnListener bean.

That's really about it in terms of code in the jspx file.

Backing Bean Code

This is where things start to get a little interesting. If you remember, one of our design goals was to avoid having to write a lot of code for each and every screen. Well, we were able to accomplish our goal by creating a superclass to use as the parent for all of our backing beans. We actually need to write no extra code in each page's backing bean, because it turns out we were able to write the code in a generic fashion.

So, let's start out with the menuActionListener method. This is the method that is called when the user clicks on a menu item. What should happen when the user clicks a menu? Well, if there are no unsaved changes on the page, then the application should do whatever the user was requesting by clicking on the menu. But, what if ther e are changes on the page? In that case, what should the application do? Well, it turns out there are 2 cases here: first, if the user was clicking the "Help" menu, the application should go ahead and display the help. However, if the user was trying to navigate somewhere else, the application should display a dialog box and give the user a choice of what to do. Our dialog gives the user 3 choices: cancel (go back to the original page), save changes and continue (go to the requested page), or discard changes and continue (go to the requested page).

Before I get into the code, a word of, ummm, well, let's say "caveat emptor" about the dialog framework. We did find some unusual behaviors related to the ADF Faces dialog framework when we were building these components - some of them have been accepted as bugs in behavior. The main issues with the dialog fram ework that caused us heartache was the behavior when returning from a dialog. It turns out that, unless the "partialSubmit" property of whatever component initiates the dialog is "true", you cannot perform any navigation/page refresh/etc in the return listener of a pop-up dialog. To make a long story short, we decided to make our dialog open in the same window (set the useWindow property to false).

One other issue that we faced was how to determine whether the page had unsaved changes, or was "dirty," in colloquial terms. It would sure be a pain to have to compare each field's value with the database to determine if the record was dirty. After playing around, we noticed something... if you drop a commit button from the data control palette on to your page, by default it is only enabled if there are changes that need to be saved... hmmm... that looks like some behavior we could use. In that commit button, the "disabled" property is set to "#{!bindings.Commit.enabled}" so it turns out we can use that EL expression to determine if there are changes to save or not. The only requirement is that each page needs to have a Commit action binding, and most of ours do.

So, the code.... (all of this code lives in the class that is the superclass for all of our backing beans)


public void menuActionListener(ActionEvent ae)
{


String outcome;

// Determine the desired navigation outcome

outcome = (String) JSFUtils.resolveExpression("#{pg.outcome}");

// If it's help, allow it to proceed

if (outcome.equals("dialog:Help"))
{
performNavigation(outcome);
return;
}

// If the data is clean, allow the navigation to proceed, otherwise,
// display the "Confirm Navigation" dialog

if (!isDirty())
{
performNavigation(outcome);
return;
}
else
{
displayConfirmNavigationDialog(ae.getComponent(), outcome);
}
}
We use a few helper methods here:


protected boolean isDirty()
{
Boolean b;
// if the page has no bindings, it's by definition not dirty

if (_bindings == null)
{
return false;
}

b = ((Boolean) JSFUtils.resolveExpression("#{bindings.Commit.enabled}"));

// if there is no commit binding, the form is by definition not dirty

if (b == null)
{
return false;
}

return b.booleanValue();
}

Note that we inject "bindings" as a managed property into every managed bean. The bindings property actually exists in the superclass


private void displayConfirmNavigationDialog(UIComponent component, String outcome)
{
FacesContext context = FacesContext.getCurrentInstance();
ViewHandler vh = context.getApplication().getViewHandler();
UIViewRoot dialog = vh.createView(context, "/infrastructure/ConfirmSaveChangesBeforeNavigate.jspx");

AdfFacesContext a = AdfFacesContext.getCurrentInstance();
HashMap props = new HashMap();
HashMap params = new HashMap();

params.put("outcome", outcome);

a.launchDialog(dialog, params, component, false, props);

}
We put the desired outcome into the dialog's parameters so that when the dialog returns, we can navigate, if desired. Here's a little utility method that is used to perform navigation, given a JSF navigation case:


protected void performNavigation(String
outcome)
{
FacesContext context = FacesContext.getCurrentInstance();
NavigationHandler nh = context.getApplication().getNavigationHandler();

nh.handleNavigation(context, "", outcome);
}
The dialog looks like this:


That's really about it. Now, what happens when the user selects an option in the dialog? Control returns to the returnListener:


public void menuReturnListener(ReturnEvent returnEvent)
{
String rv = (String) returnEvent.getReturnValue();
String outcome;

if (rv == null || returnEvent.getReturnParameters() == null)
{
return;
}

outcome = (String) returnEvent.getReturnParameters().get("outcome");

if (rv.equals("Navigate:Cancel"))
{
return;
}

if (rv.equals("Navigate:Save"))
{
if (performSaveChanges())
{
performNavigation(outcome);
}
return;
}

if (rv.equals("Navigate:DontSave"))
{
if (performCancelChanges())
{
performNavigation(outcome);
}
return;
}
}


The return listener simply looks at what the user requested and performs the requested action. There are a couple of helper methods used there too:


protected boolean performSaveChanges()
{

BindingContainer bindings = getBindings();

OperationBinding operationBinding = bindings.getOperationBinding("Commit");

Object result = operationBinding.execute();

if (!operationBinding.getErrors().isEmpty())
{
return false;
}
return true;
}

protected boolean performCancelChanges()
{
DCBindingContainer bindings = getBindings();

bindings.getDataControl().getApplicationModule().getTransaction().rollback();

return true;
}
That's all! I appreciate if you'd leave a comment if you find this useful.

Friday, March 03, 2006

Time for a weekend update

Wow, it's been a really busy week - I haven't kept up with my plan to post a blog entry once per week, but I think I'll eke out some time over the weekend. I've been working on a client project using JDeveloper 10.1.3 with the full ADF stack (ADF Faces + ADF Business Components), and it's been both enjoyable and challenging. I would even say that it's one of the most interesting projects technology-wise that I've done in the past few years.

We've developed some re-usable components that have made our life much easier, and I'll be writing about one of them over the weekend - a component that prompts the user to save changes when doing something (like attempting to navigate away from the page). The component actually works with no per-page code in the backing beans - it's all handled in a superclass that we use for all of the backing beans.

Not much to say other than "almost the weekend"

Tuesday, February 21, 2006

Using a custom login module with JDev 10.1.3

There's been a lot of traffic on the JDeveloper Forum in the past few days about custom LoginModule's both inside of JDeveloper's embedded OC4J and in OC4J standalone. After trials and tribulations, I've got it working in both places, and wanted to share the "how to" with others, so here goes...

What is a LoginModule?

A LoginModule is a class specified in the Java security specification that can be used to authenticate users and to assign roles to those users. In my case, I have user/role information stored in a database, so neither of the two Oracle-supplied LoginModule configurations (file-based or LDAP-based) would work for me. So, using the information in this article by Frank Nimphius and Duncan Mills for guidance, I developed my own LoginModule that would use a stored procedure to authenticate against the database. Now, the "fun" stuff starts... how to get this working in the embedded OC4J that comes with JDeveloper 10.1.3?

JDeveloper 10.1.3 Configuration for Custom Login Modules

Please note to replace brackets [ and ] with less-than and greater-than symbols in the following examples

Basically, there's a few simple steps that need to be done:

  1. Package your login module up into a jar file. I'm not going to go into any details here, but it's pretty straightforward to use a deployment profile to create a jar file with your login module and all of its dependent classes.

  2. Put the jar file containing your login module into [jdeveloper_home_directory]/jdev/lib. I suppose it could be anywhere, but this is a pretty convenient place for it.

  3. Make sure the embedded oc4j is shut down (go to the "Run" menu, and use the terminate option to shut it down if it's running.

  4. The next thing to do is to ensure that your login module JAR file is visible to the embedded oc4j. The configuration files for the embedded oc4j are in [jdeveloper_home_directory]/jdev/system/oracle.j2ee.10.1.3.36.73/embedded-oc4j/config (at least for the current version as of the date I'm writing this). You need to add a line to the application.xml using your favorite text editor that looks like this:

    [library path="C:\o\jdev1013\jdev\lib\TestLogin.jar"/]

    (my login module was in a JAR called TestLogin.jar)

  5. The next thing to do is to tell the embedded OC4J to use a custom login module and dynamic roles. In the same application.xml, locate the line that looks like this:


    [jazn provider="XML"/]


    and replace it with this:

    [jazn provider="XML"]
    [property name="custom.loginmodule.provider" value="true"/]
    [property name="role.mapping.dynamic" value="true"/]
    [/jazn]


  6. The next thing you need to do is to configure the application to use a custom login module. This configuration is done in the system-jazn-data.xml file in the same directory. One thing to note is that the J2EE application name is ALWAYS "current-workspace-app" in the embedded OC4J. Here is the relevant section from my system-jazn-data.xml:


    [application]
    [name]current-workspace-app[/name]
    [login-modules]
    [login-module]
    [class]john.TestLogin[/class]
    [control-flag]required[/control-flag]
    [options]
    [option]
    [name]application_realm[/name]
    [value]test[/value]
    [/option]
    [option]
    [name]jdbcUrl[/name]
    [value]jdbc:oracle:thin:un/pw@localhost:1521:ORCL[/value]
    [/option]
    [/options]
    [/login-module]
    [/login-modules]
    [/application]


    Your login module may have other options, so configure as necessary. My custom LoginModule was "john.TestLogin" and had 2 options: jdbcUrl and application_realm

  7. Configure your application for security as per the J2EE spec. In my case, it was simply adding some stuff to web.xml for my project in JDev.


  8. That's it! Now when you run your application from within JDeveloper, it should prompt for a login (you can change the config to use a form instead of the default BASIC authentication)
OC4J Standalone and Oracle AS 10.1.3 Configuration

Fortunately, the configuration with OC4J standalone and Application Server 10.1.3 is much simpler. The enterprise manager deployment wizard actually has some screens to allow you to configure the login module. This process is documented pretty well, but here's a short synopsis:

  1. Make your login module JAR file available in the classpath. I did this by editing application.xml (in [oc4j_home]/j2ee/home/config) to include a [library] element (just like for the embedded configuration above.

  2. Deploy your application using the OC4J/AS enterprise manager. When you get to step 3, (Deployment Settings), look what you've got:


  3. Now, you can click to "Select Security Provider" and "Map Security Roles"
I hope this helps those who are struggling with this, as I was.

Monday, February 20, 2006

I guess I'm a blogger now

Hello all. I've decided to take the plunge and start a blog to share experiences, tips, techniques, etc that I've learned in developing a web application for a client using JDeveloper 10.1.3 and the whole ADF stack (ADF Business Components and ADF Faces). I've learned a lot from the kind people over at the JDeveloper Forum, and I wanted to share some of what I've learned and developed.

I've got a few ideas for topics, and would be interested in some more ideas. Here's what I've got so far:

  • Prompting the user to save changes when navigating away from a "dirty" screen.
  • Implementing a dynamic menu with security.
  • Extending an ADF Faces component.
  • Using CVS with an ADF project.
  • Using custom Login Modules.
I'm not sure yet how often I'll be able to post, but I hope to get something in once a week or more. If you've got ideas on other topics, be sure to post a comment. Heck, if you'd like to post an article yourself - that would be cool too.